An application where you get to create and edit data isn’t that helpful if you don’t have a way to show that the data is yours. To get around this, we need to allow users to sign up and authenticate and own the songs that they create. In this tutorial, we’ll utilize the authentication functionality in Firebase create users and allow them to sign into the application.
Goals
- Add user sign up and authentication using Firebase.
Firebase is already acting as the database for our application so that we didn’t need to create a custom backend, and thankfully we can also utilize it for authentication. We’re going to give our potential users the ability to sign up with email and password or to sign in with Facebook.
We won’t be associating data with the user’s in this tutorial because it would be too long.
Creating Firebase Authentication Methods
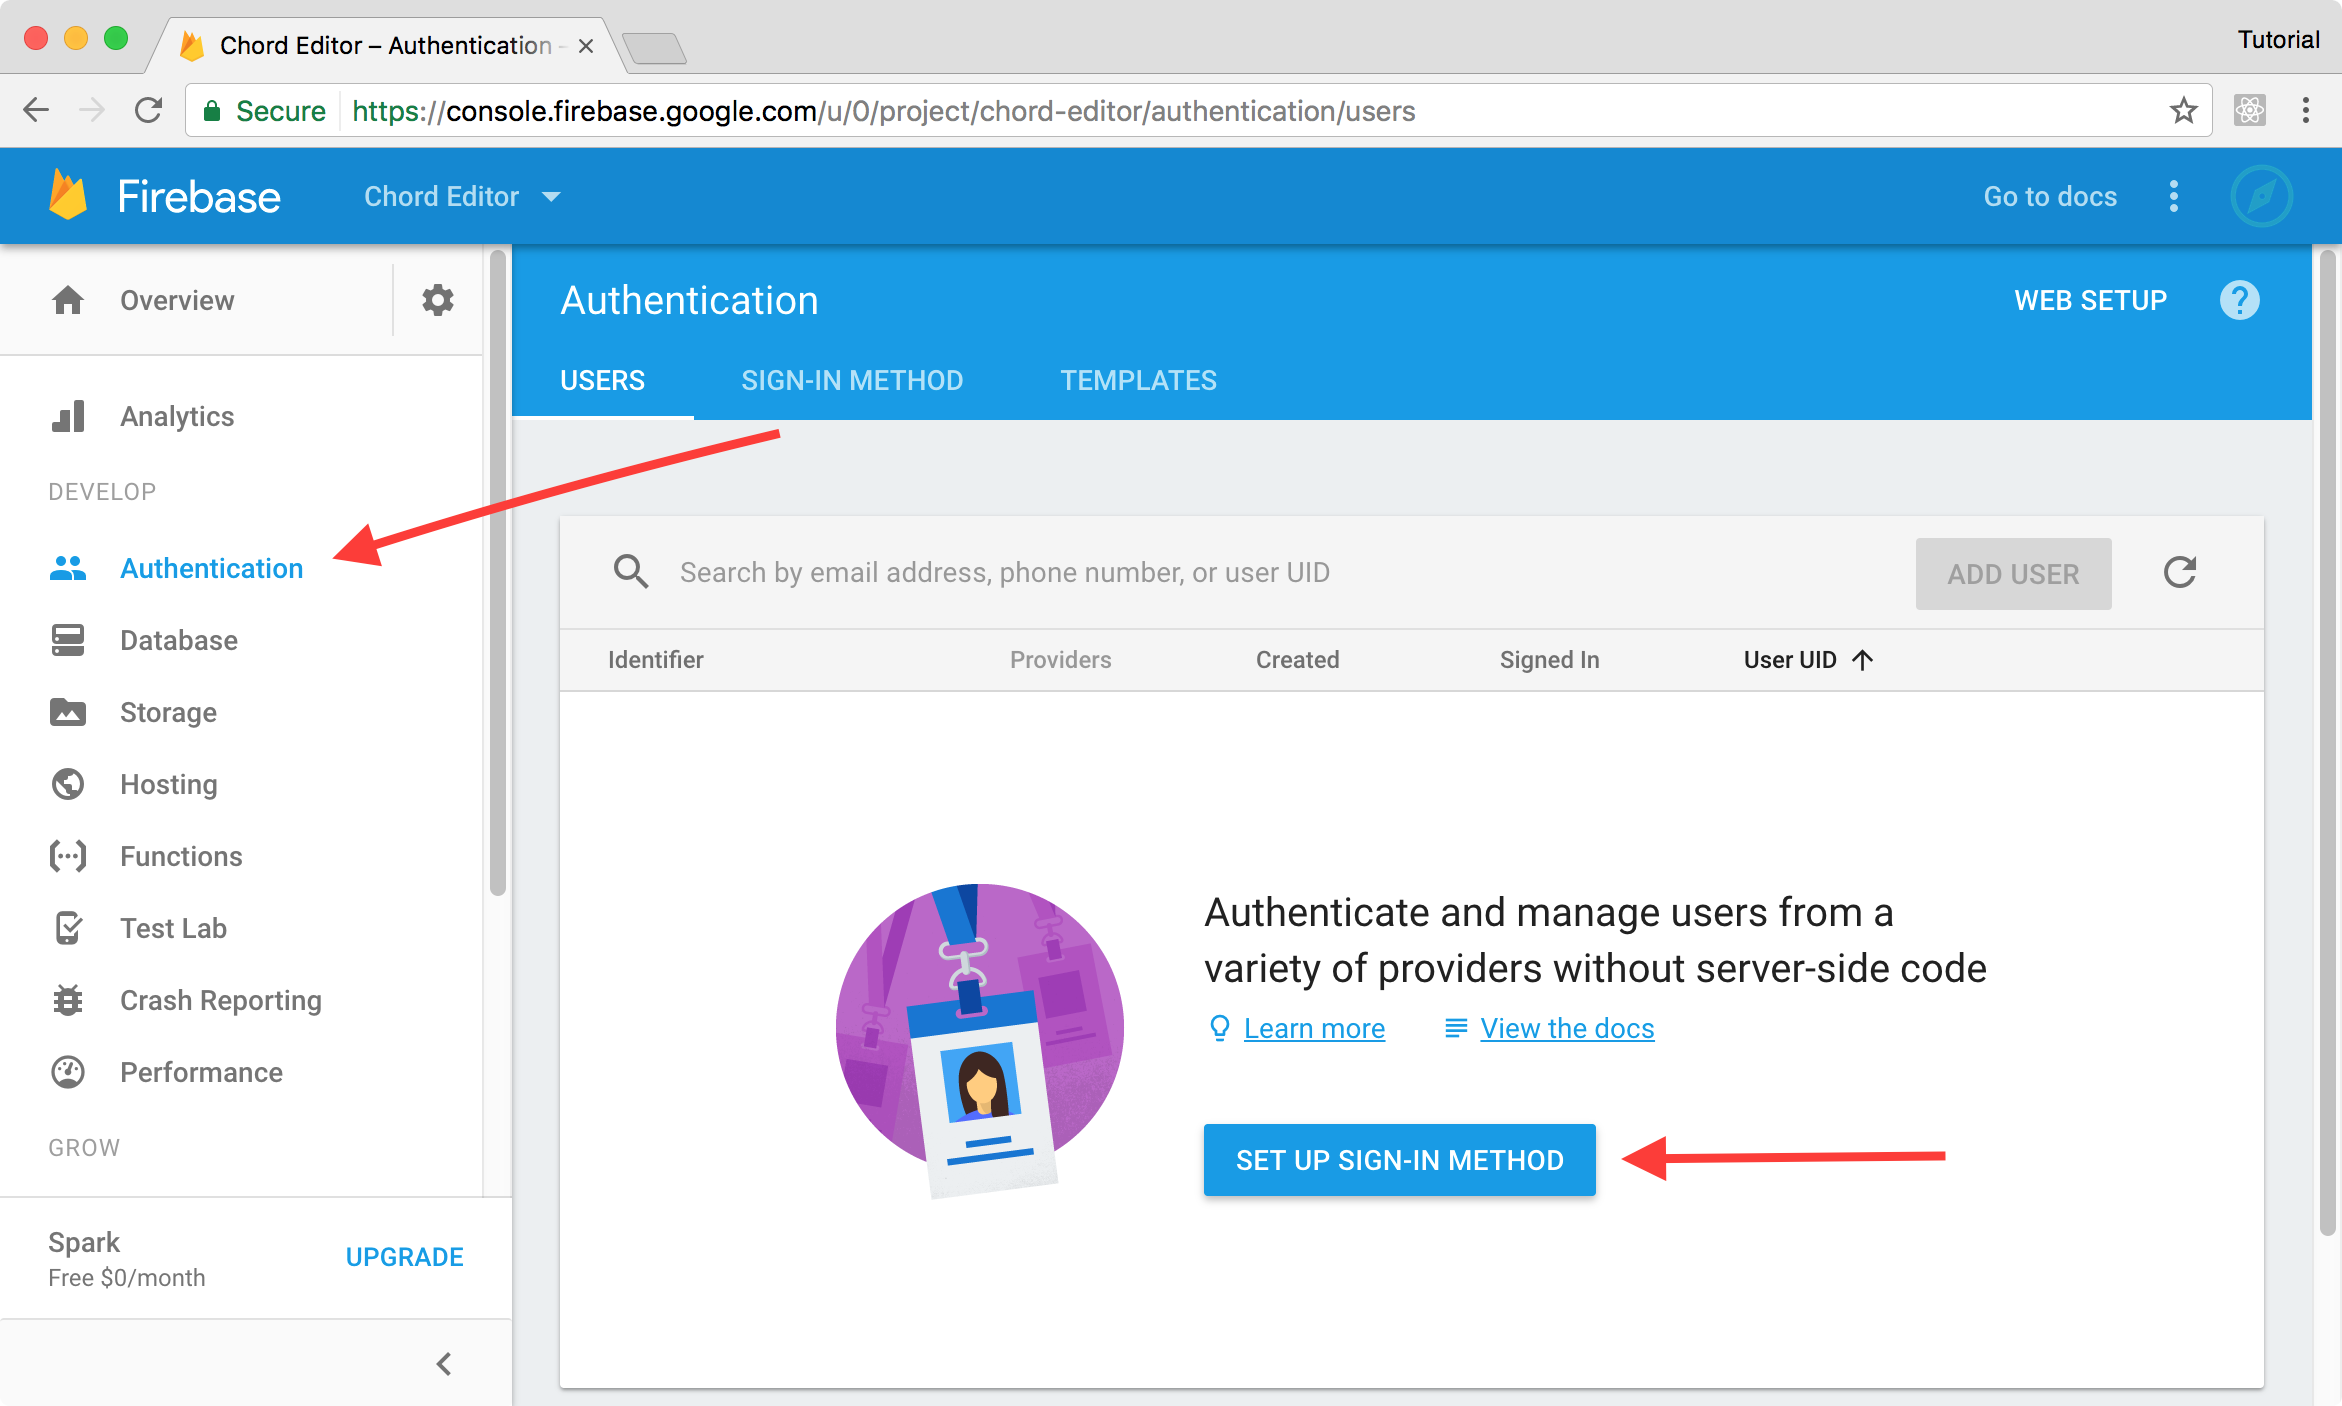
Before we can make any changes to our application, we need to set up “sign-in methods” for Facebook and email/password within Firebase. You can get to where you need to go for this by clicking “Authentication” in the sidebar of the Firebase console and then clicking “Set up Sign-in Methods.”
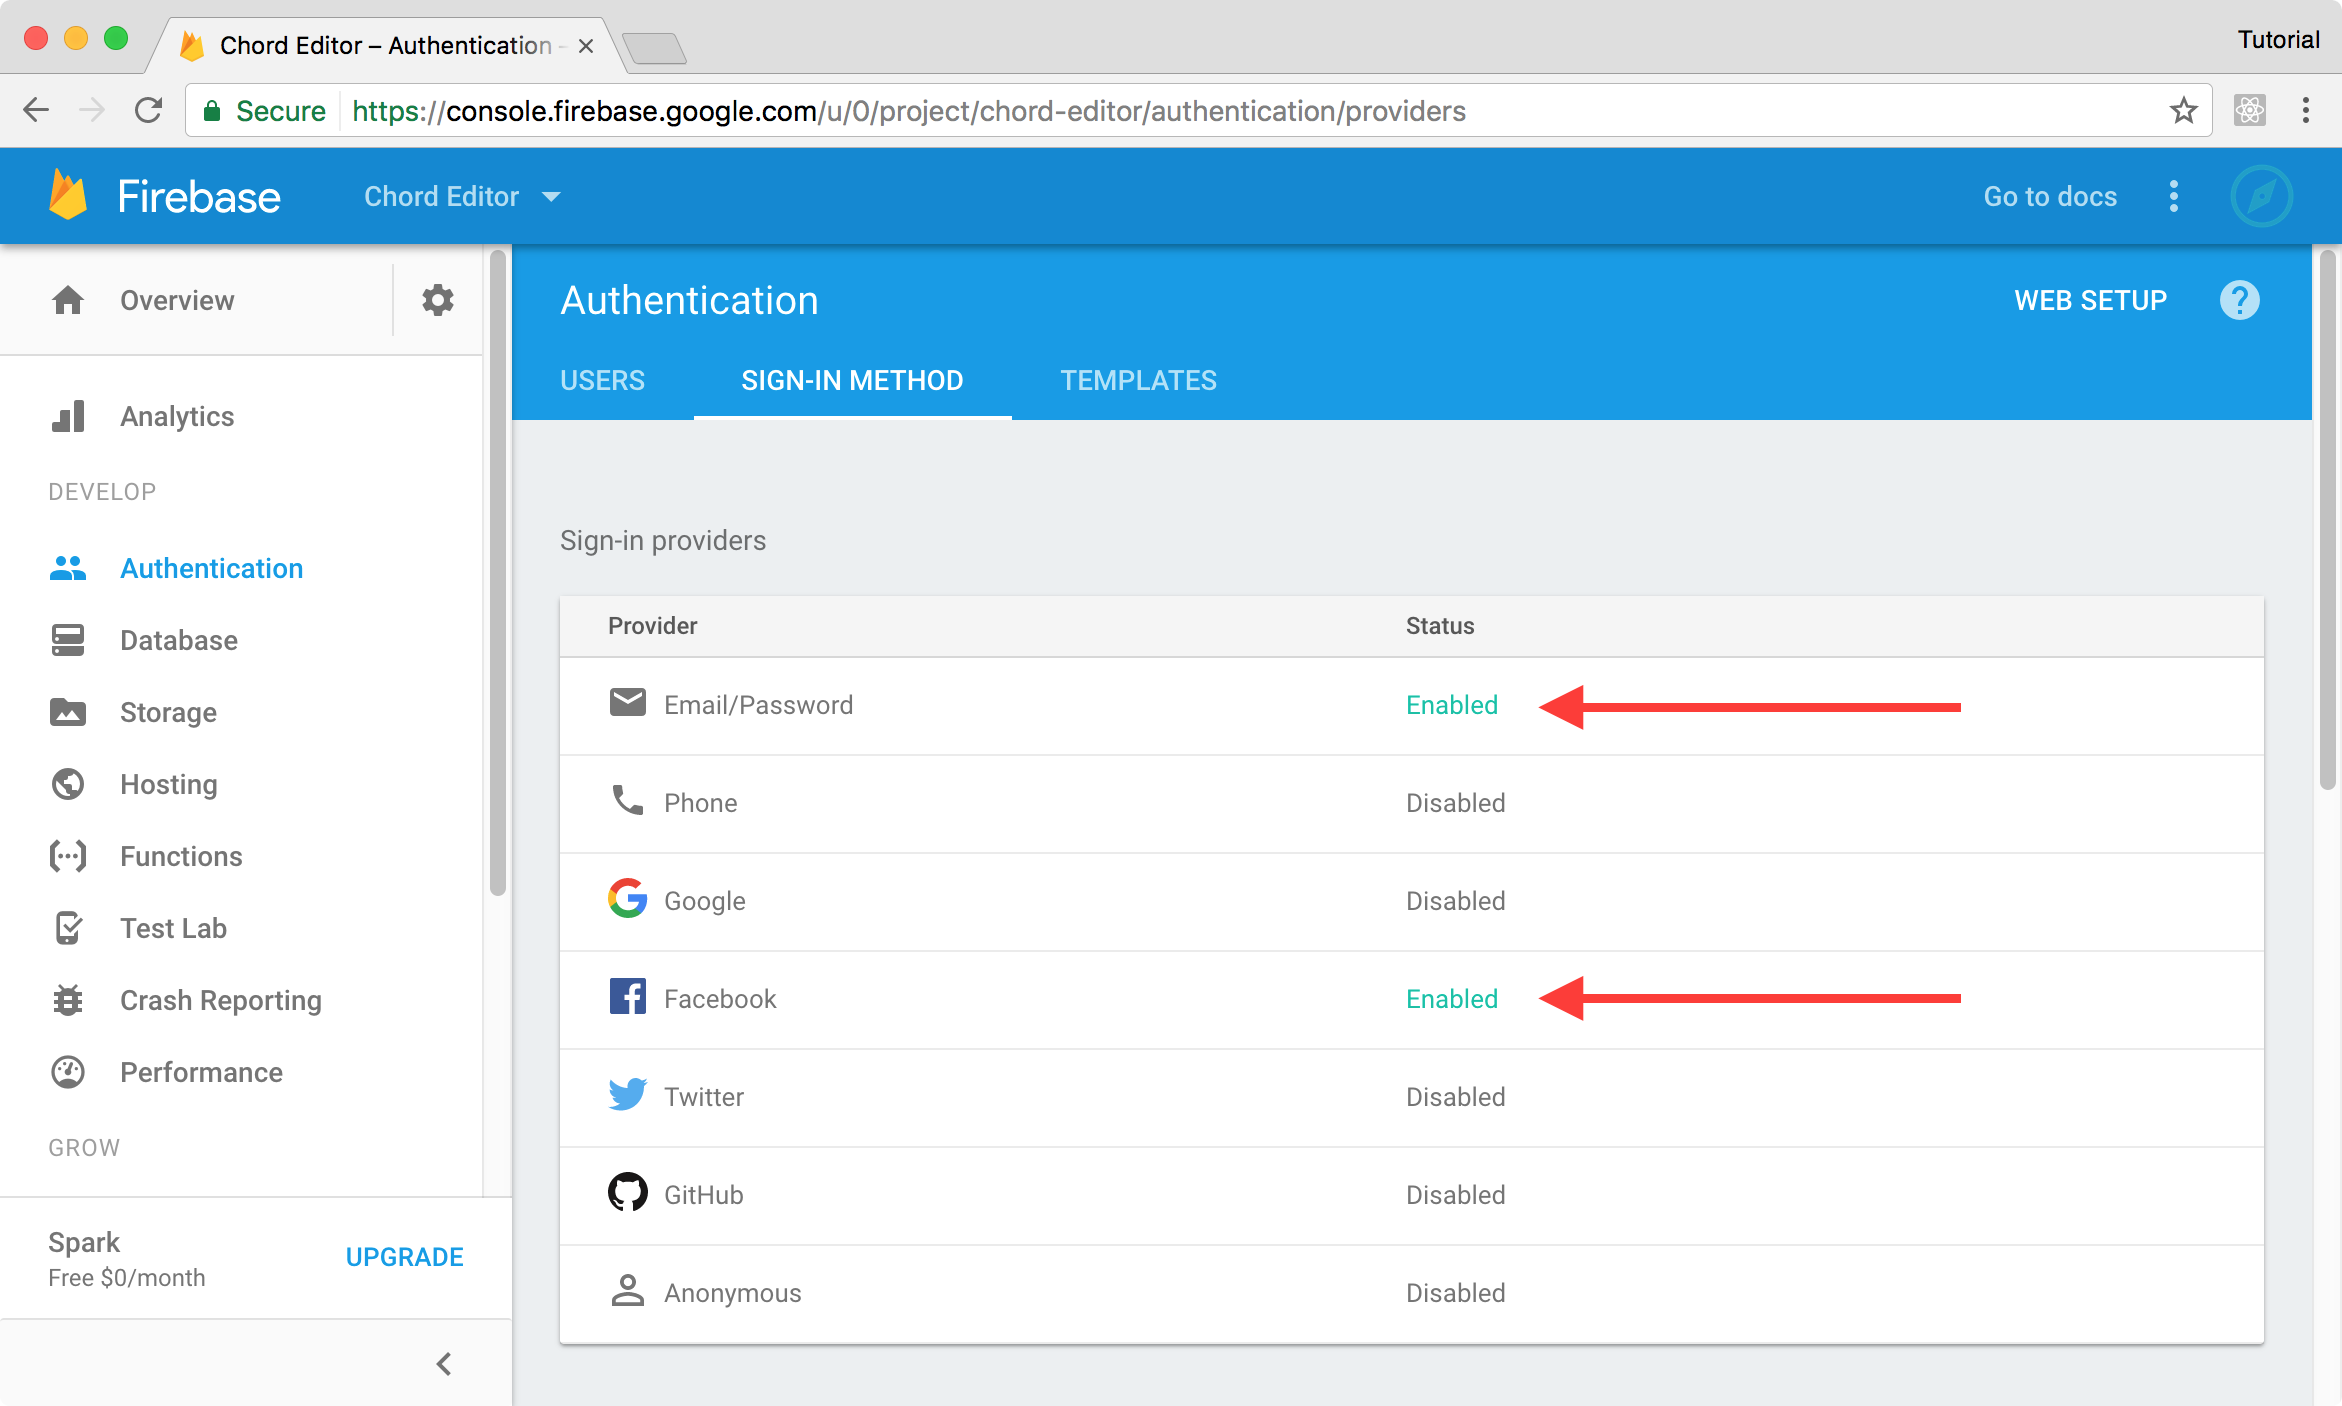
From here you’ll want to enable the “Email/Password” provider by clicking the row and then selecting to enable it from the dialog. When you enable the “Facebook” provider, you’ll then need to get an application id and secret.
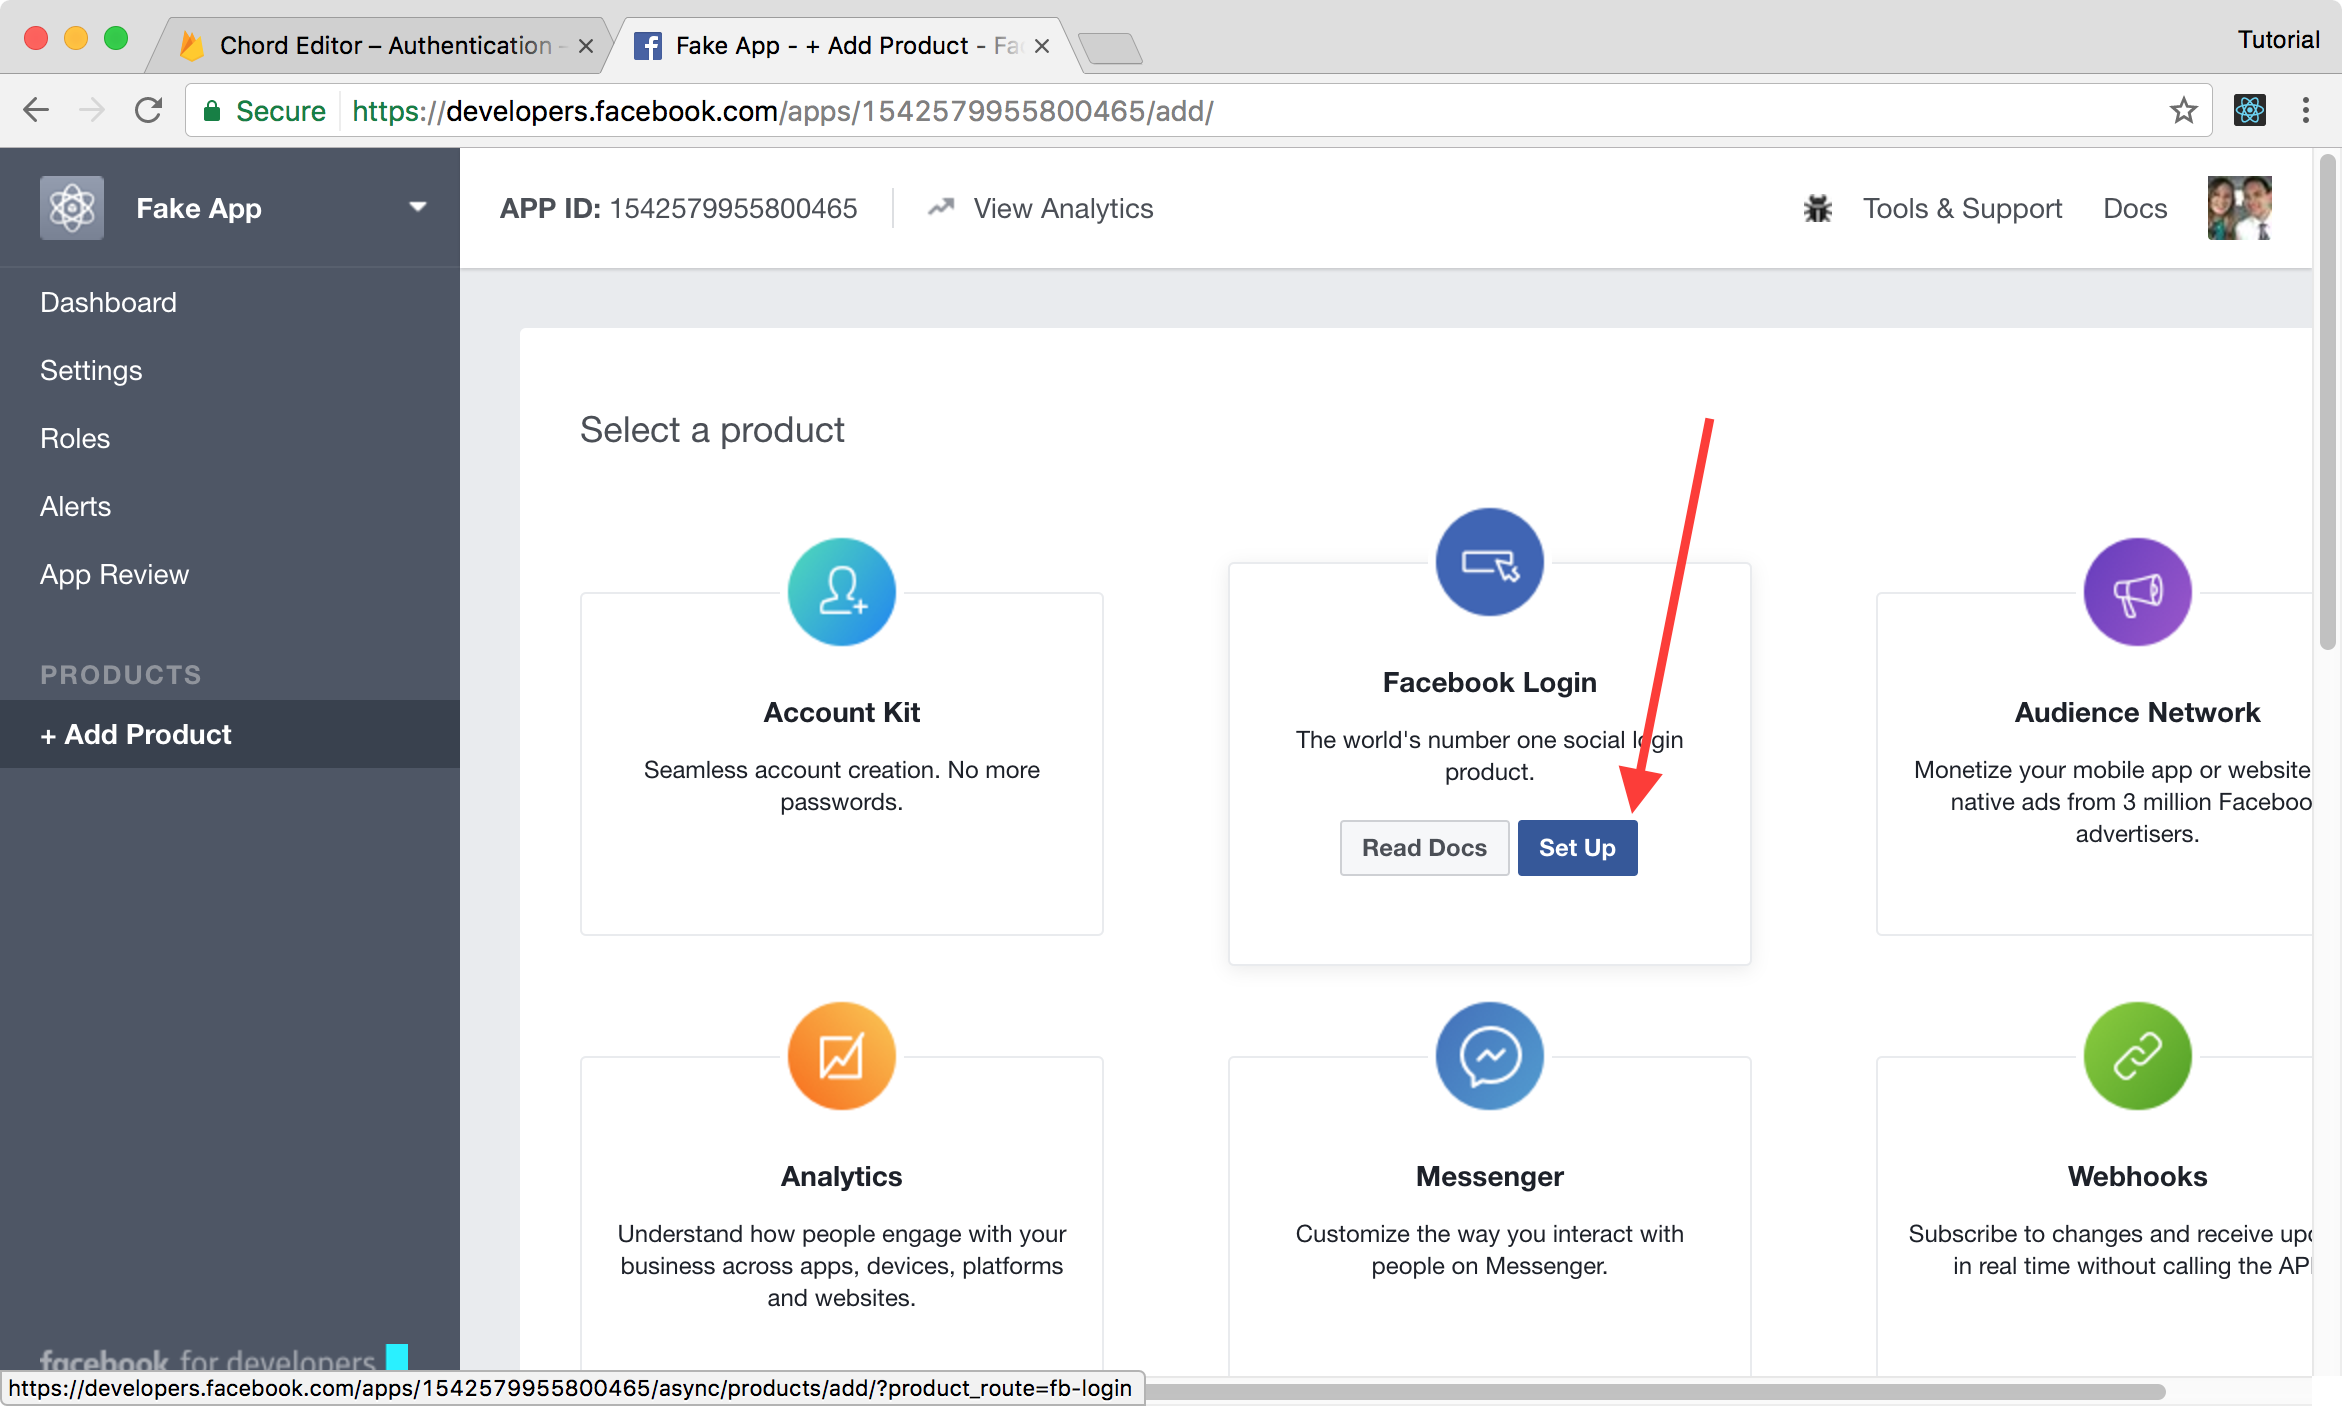
To add Facebook, you’ll need to first create a Facebook app by heading to the Facebook Developers site. Once you’ve created the app, you’ll want to add the “Facebook login” product to the app.
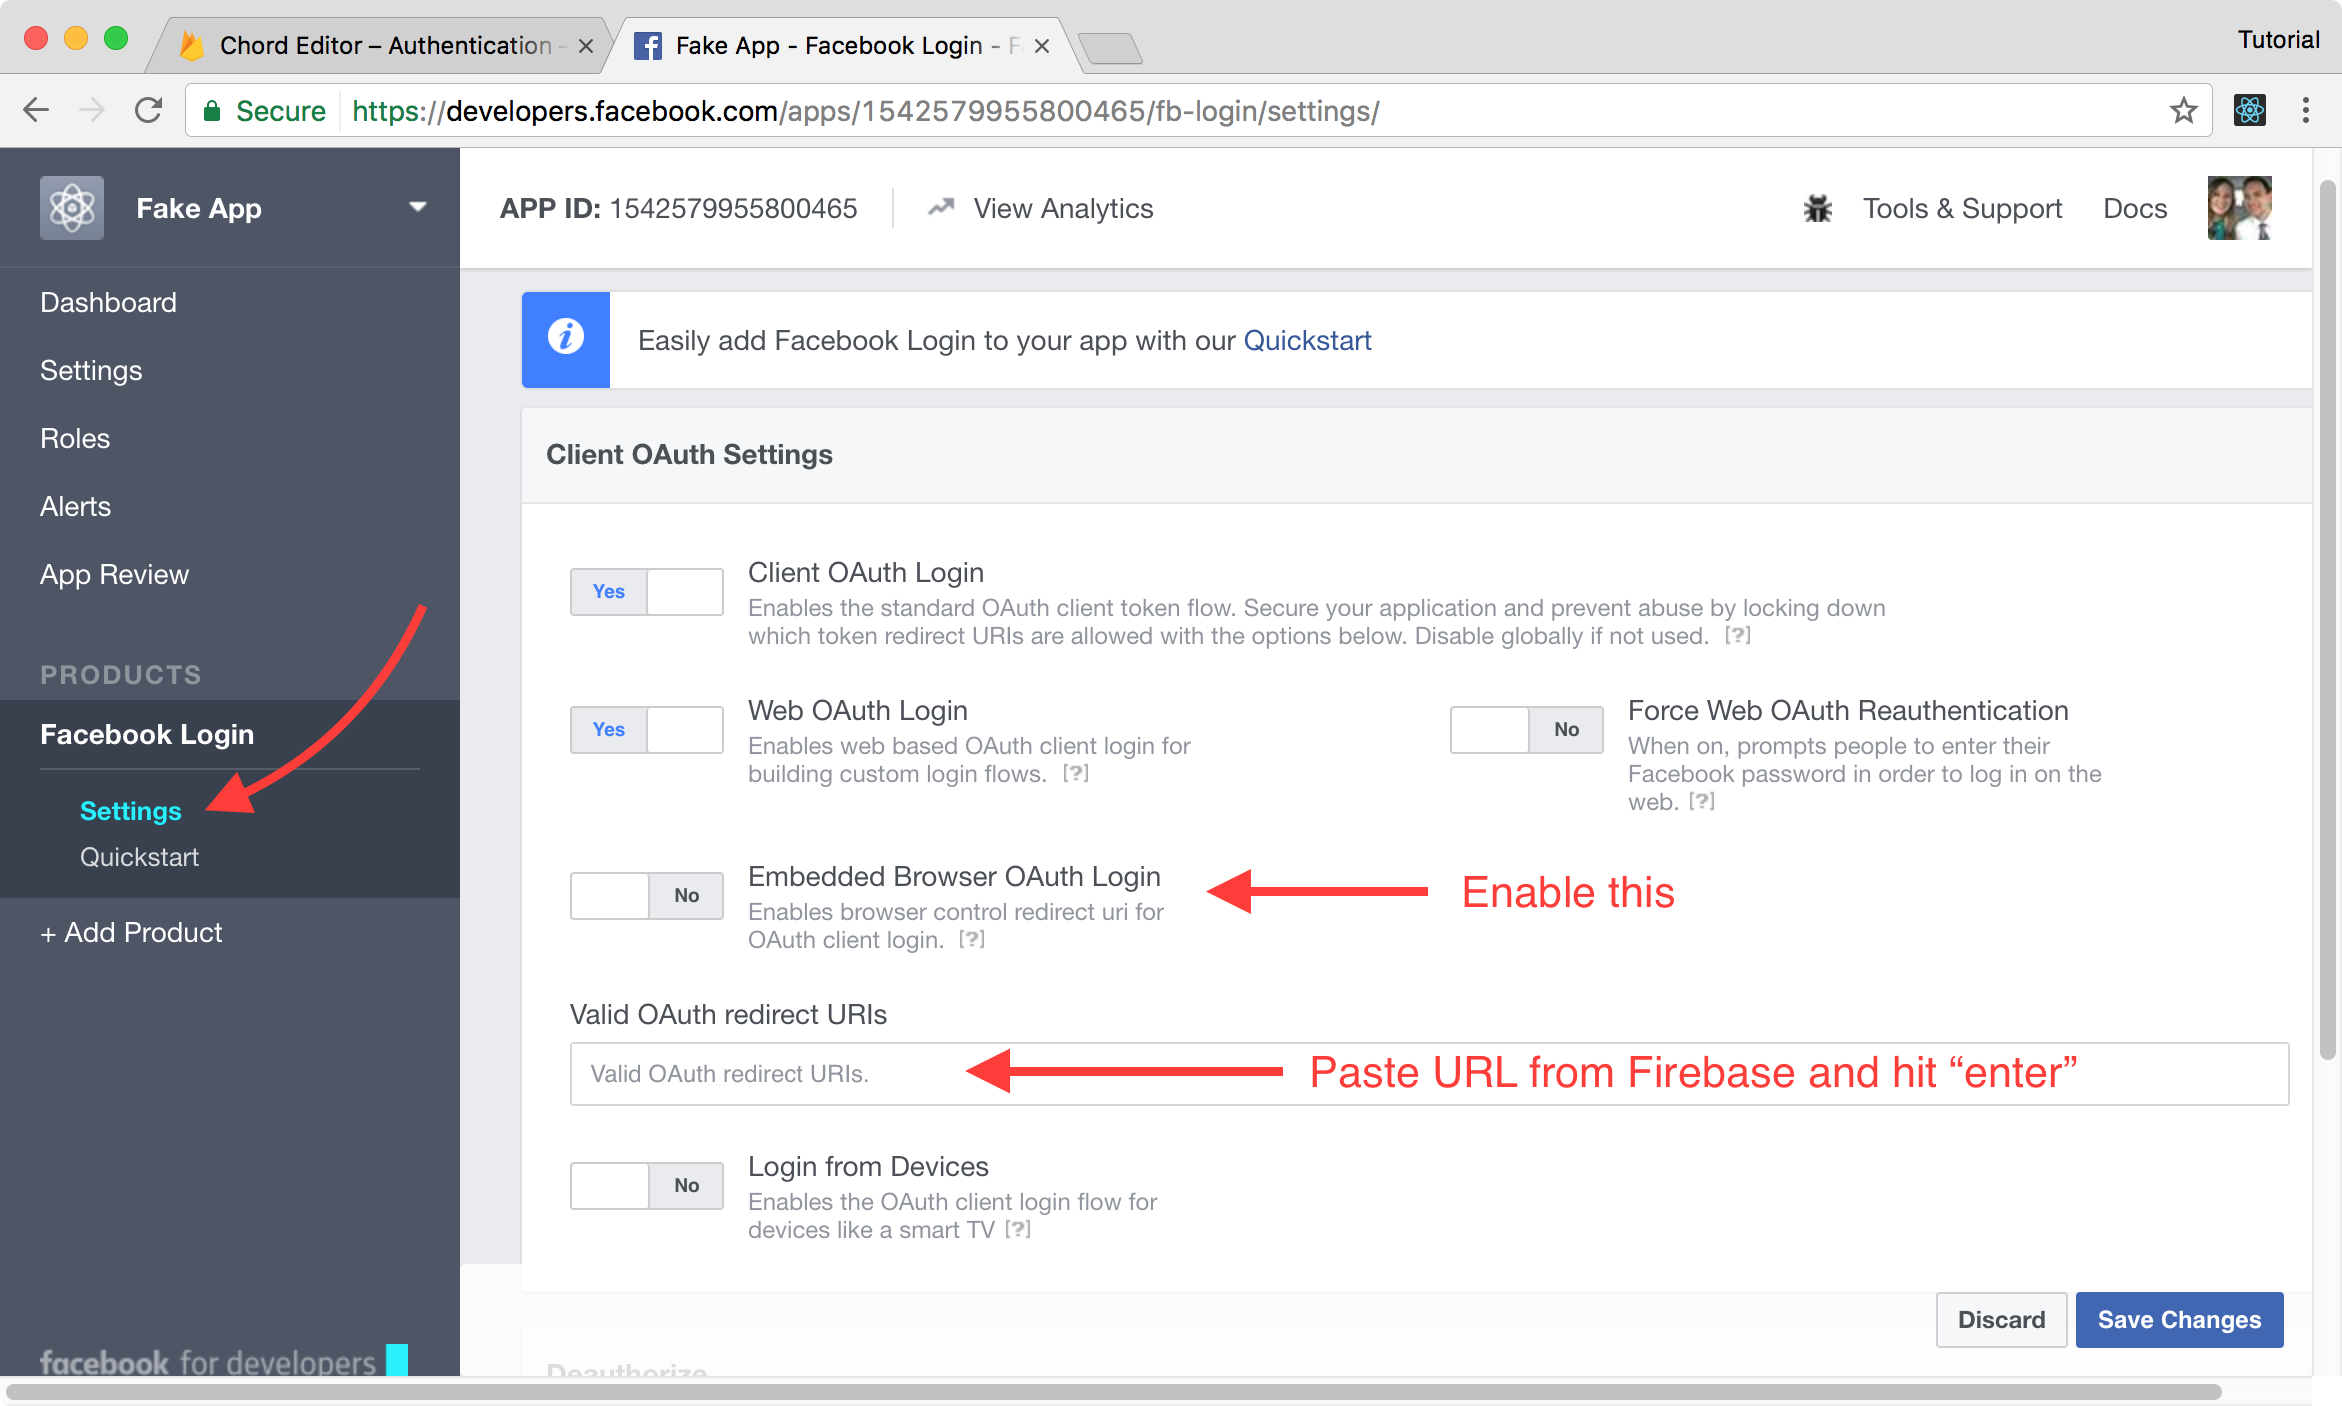
By default, you’ll be taken to the quick start for this product, but we don’t want that. Select “Settings” under “Facebook Login” in the sidebar. Next, you’ll need to enable “Embedded Browser OAuth Login” and paste the callback URL that Firebase provided in the Facebook configuration dialog into the “Valid OAuth redirect URIs” field (hit “enter” to make sure that it looks like a blue bubble) and save the settings.
Finally, with the app configured we’re ready to copy the values that we went to Facebook to get. Click on “Dashboard” from the sidebar and then you can copy the client id and secret to paste into Firebase.
Adding Sign Up/Sign In to the Application
With the backend configured it is time for us to add authentication to the React application. The first thing that we need to do is to create a way for a new user to sign up. This will require a few things:
- Calls to action to “Register” and “Log In” in the navigation if the user isn’t already signed in.
- A new
Logincomponent to render an email password field or Facebook login. - Rendering the header that we currently have if the user is signed in.
We’re going to create a single component for the registration and sign in processes since we’re supporting Facebook auth and that handles both at the same time.
Modifying the Header
The first thing we need is to have some state reflected in the Header, and we’re going to accomplish this by passing in a prop from App. Let’s add that state to App now.
src/App.js
// imports omitted
class App extends Component {
  constructor() {
    super();
    this.addSong = this.addSong.bind(this);
    this.updateSong = this.updateSong.bind(this);
    this.state = {
      songs: { },
      authenticated: false,
    };
  }

  // unchanged life cycle and custom functions omitted

  render() {
    return (
      <div style={{maxWidth: "1160px", margin: "0 auto"}}>
        <BrowserRouter>
          <div>
            <Header authenticated={this.state.authenticated} />
            <div className="main-content" style={{padding: "1em"}}>
              <div className="workspace">
                <Route exact path="/songs" render={(props) => {
                  return (
                    <SongList songs={this.state.songs} />
                  )
                }} />
                <Route path="/songs/:songId" render={(props) => {
                  const song = this.state.songs[props.match.params.songId];
                  return (
                    song
                    ? <ChordEditor song={song} updateSong={this.updateSong} />
                    : <h1>Song not found</h1>
                  )
                }} />
              </div>
            </div>
          </div>
        </BrowserRouter>
        <Footer />
      </div>
    );
  }
}
With the authenticated value passed to the Header we now have something that we can use to conditionally render content in the navigation. Now let’s make that change now:
src/components/Header.js
// imports omitted
class Header extends Component {
  render() {
    return (
      <nav className="pt-navbar">
        <div className="pt-navbar-group pt-align-left">
          <div className="pt-navbar-heading">Chord Creator</div>
          {this.props.authenticated
              ? <input className="pt-input" placeholder="Search Songs..." type="text" />
              : null
          }
        </div>
        {this.props.authenticated
            ? (
              <div className="pt-navbar-group pt-align-right">
                <Link className="pt-button pt-minimal pt-icon-music" to="/songs">Songs</Link>
                <span className="pt-navbar-divider"></span>
                <button className="pt-button pt-minimal pt-icon-user"></button>
                <button className="pt-button pt-minimal pt-icon-cog"></button>
              </div>
            )
            : (
              <div className="pt-navbar-group pt-align-right">
                <Link className="pt-button pt-intent-primary" to="/login">Register/Log In</Link>
              </div>
            )
        }
      </nav>
    );
  }
}
Note: We’re putting the
.pt-navbar-groupin both versions of the right side because JSX can’t be returned from anything as more than one component side-by-side if it’s not wrapped in a container.
Creating the Login Component
Now when we look at the application, we can see a button in the navigation to log in. It’s time to create the component to handle that and set up the routing for the /login route. Let’s first create the Login component:
src/components/Login.js
import React, { Component } from 'react'

const loginStyles = {
  width: "90%",
  maxWidth: "315px",
  margin: "20px auto",
  border: "1px solid #ddd",
  borderRadius: "5px",
  padding: "10px"
};

class Login extends Component {
  constructor() {
    super()
    this.authWithFacebook = this.authWithFacebook.bind(this)
    this.authWithEmailPassword = this.authWithEmailPassword.bind(this)
  }

  authWithFacebook() {
    console.log("We're authing with Facebook")
  }

  authWithEmailPassword(event) {
    event.preventDefault()
    console.log("We're authing with password")
    console.table([{
      email: this.emailInput.value,
      password: this.passwordInput.value,
    }])
  }

  render() {
    return (
      <div style={loginStyles}>
        <button style={{width: "100%"}} className="pt-button pt-intent-primary" onClick={() => this.authWithFacebook()}>Log In with Facebook</button>
        <hr style={{marginTop: "10px", marginBottom: "10px"}} />
        <form onSubmit={(event) => this.authWithEmailPassword(event)}>
          <div style={{marginBottom: "10px"}} className="pt-callout pt-icon-info-sign">
            <h5>Note</h5>
            If you don't have an account already, this form will create your account.
          </div>
          <label className="pt-label">
            Email
            <input style={{width: "100%"}} className="pt-input" name="email" type="email" ref={(input) => {this.emailInput = input}} placeholder="Email"></input>
          </label>
          <label className="pt-label">
            Password
            <input style={{width: "100%"}} className="pt-input" name="password" type="password" ref={(input) => {this.passwordInput = input}} placeholder="Password"></input>
          </label>
          <input style={{width: "100%"}} type="submit" className="pt-button pt-intent-primary" value="Log In"></input>
        </form>
      </div>
    )
  }
}

export default Login
This version of the component doesn’t handle the Firebase authenticate portion yet; we’re first making sure that we’re wired up the basic React events properly. We need to render the this route before we can test the code.
src/App.js
// Only showing `render` function
  render() {
    return (
      <div style={{maxWidth: "1160px", margin: "0 auto"}}>
        <BrowserRouter>
          <div>
            <Header authenticated={this.state.authenticated} />
            <div className="main-content" style={{padding: "1em"}}>
              <div className="workspace">
                <Route exact path="/login" component={Login}/>
                <!-- Additional Routes omitted -->
              </div>
            </div>
          </div>
        </BrowserRouter>
        <Footer />
      </div>
    );
  }
Now if we click the navigation button to “Register/Log In” we will see our new form. When we fill it out and submit, we should see the field values in the console.
Utilizing Firebase Authentication
Re-base provides us with a way to interact with the data that we’ve stored in Firebase, but the most recent version of the library dropped support for authentication (because you can use the firebase.Application itself for that). Our src/base.js is currently only exporting the base constant, so we’ll need to add app to the list so that we can utilize it from our Login component. We’ll also need to have a FacebookAuthProvider, so we’ll create one of those in src/base.js and return that too.
src/base.js
// lines above omitted
const facebookProvider = new firebase.auth.FacebookAuthProvider()

export { app, base, facebookProvider }
Let’s pull in app and facebookProvider and set up our Facebook login first by implementing
our authWithFacebook function. We’re also going to add in a way to redirect using the Redirect
component from react-router. To show errors, we’ll use a Toaster from Blueprintjs.
src/components/Login.js
import React, { Component } from 'react'
import { Redirect } from 'react-router-dom'
import { Toaster, Intent } from "@blueprintjs/core";

import { app, facebookProvider } from '../base'

// loginStyles omitted (unchanged)

class Login extends Component {
  constructor() {
    super()
    this.authWithFacebook = this.authWithFacebook.bind(this)
    this.authWithEmailPassword = this.authWithEmailPassword.bind(this)
    this.state = {
      redirect: false
    }
  }

  authWithFacebook() {
    app.auth().signInWithPopup(facebookProvider)
      .then((result, error) => {
        if (error) {
          this.toaster.show({ intent: Intent.DANGER, message: "Unable to sign in with Facebook" })
        } else {
          this.setState({ redirect: true })
        }
      })
  }

  // authWithEmailPassword omitted (unchanged)

  render() {
    const { from } = this.props.location.state || { from: { pathname: '/' } }
    const { redirect } = this.state

    if (redirect) {
      return (
        <Redirect to={from} />
      )
    }

    return (
      <div style={loginStyles}>
        <Toaster ref={(element) => { this.toaster = element }} />
        <button style={{width: "100%"}} className="pt-button pt-intent-primary" onClick={() => this.authWithFacebook()}>Log In with Facebook</button>
        <hr style={{marginTop: "10px", marginBottom: "10px"}} />
        <form onSubmit={(event) => this.authWithEmailPassword(event)}
          ref={(form) => { this.loginForm = form }}>
          <div style={{marginBottom: "10px"}} className="pt-callout pt-icon-info-sign">
            <h5>Note</h5>
            If you've never logged in, this will create your account.
          </div>
          <label className="pt-label">
            Email
            <input style={{width: "100%"}} className="pt-input" name="email" type="email" ref={(input) => {this.emailInput = input}} placeholder="Email"></input>
          </label>
          <label className="pt-label">
            Password
            <input style={{width: "100%"}} className="pt-input" name="password" type="password" ref={(input) => {this.passwordInput = input}} placeholder="Password"></input>
          </label>
          <input style={{width: "100%"}} type="submit" className="pt-button pt-intent-primary" value="Log In"></input>
        </form>
      </div>
    )
  }
}

export default Login
If we click the button to “Log In with Facebook” we will see a popup the first time that requires us to authorize the application, but every time after that the popup should open and then quickly close and redirect us. The redirect works, but our header didn’t change as we expected. It makes sense because we didn’t set the authenticated state. For our application to work the way we want it to we’re going to need to tie some authentication login into the life-cycle of our application in componentWillMount. Let’s add this to App now.
src/App.js
// everything but componentWillMount and componentWillUnmount omitted (unchanged)
  componentWillMount() {
    this.removeAuthListener = app.auth().onAuthStateChanged((user) => {
      if (user) {
        this.setState({
          authenticated: true
        })
      } else {
        this.setState({
          authenticated: false
        })
      }
    })

    this.songsRef = base.syncState('songs', {
      context: this,
      state: 'songs'
    });
  }

  componentWillUnmount() {
    this.removeAuthListener();
    base.removeBinding(this.songsRef);
  }
The page should have auto refreshed when you changed this, and you’ll now see the header buttons we expected.
Refreshing the page again you’ll also see that the header flashes the button to log in briefly. This flash isn’t ideal, and we can get around it by adding a piece of state to indicate that the app is loading and then always set it to false once our onAuthStateChanged callback has run. If we’re loading we’ll render a Spinner from blueprintjs, otherwise, we’ll render the application as we have been.
src/App.js
import React, { Component } from 'react';
import { BrowserRouter, Route } from 'react-router-dom';
import { Spinner } from '@blueprintjs/core';
import Header from './components/Header';
import Footer from './components/Footer';
import ChordEditor from './components/ChordEditor';
import Login from './components/Login';
import SongList from './components/SongList';
import { app, base } from './base';

class App extends Component {
  constructor() {
    super();
    this.addSong = this.addSong.bind(this);
    this.updateSong = this.updateSong.bind(this);
    this.state = {
      songs: { },
      authenticated: false,
      loading: true
    };
  }

  // addSong & updateSong omitted (unchanged)

  componentWillMount() {
    this.removeAuthListener = app.auth().onAuthStateChanged((user) => {
      if (user) {
        this.setState({
          authenticated: true,
          loading: false
        })
      } else {
        this.setState({
          authenticated: false,
          loading: false
        })
      }
    })

    this.songsRef = base.syncState('songs', {
      context: this,
      state: 'songs'
    });
  }

  // componentWillUnmount omitted (unchanged)

  render() {
    if (this.state.loading === true) {
      return (
        <div style={{ textAlign: "center", position: "absolute", top: "25%", left: "50%" }}>
          <h3>Loading</h3>
          <Spinner />
        </div>
      )
    }

    return (
      <div style={{maxWidth: "1160px", margin: "0 auto"}}>
        <BrowserRouter>
          <div>
            <Header authenticated={this.state.authenticated} />
            <div className="main-content" style={{padding: "1em"}}>
              <div className="workspace">
                <Route exact path="/login" component={Login}/>
                <Route exact path="/songs" render={(props) => {
                  return (
                    <SongList songs={this.state.songs} />
                  )
                }} />
                <Route path="/songs/:songId" render={(props) => {
                  const song = this.state.songs[props.match.params.songId];
                  return (
                    song
                    ? <ChordEditor song={song} updateSong={this.updateSong} />
                    : <h1>Song not found</h1>
                  )
                }} />
              </div>
            </div>
          </div>
        </BrowserRouter>
        <Footer />
      </div>
    );
  }
}

export default App;
Logging Out
Now the initial app experience isn’t looking too bad, but we, unfortunately, don’t have a way to log out so we
can’t test our email/password login if we wrote that next. Let’s create a simple Logout component and
route before moving on.
src/components/Logout.js
import React, { Component } from 'react'
import { Redirect } from 'react-router-dom'
import { Spinner } from '@blueprintjs/core';
import { app } from '../base'

class Logout extends Component {
  constructor() {
    super()
    this.state = {
      redirect: false
    }
  }

  componentWillMount() {
    app.auth().signOut().then((user, error) => {
      this.setState({ redirect: true })
    });
  }

  render() {
    if (this.state.redirect === true) {
      return <Redirect to="/" />
    }

    return (
      <div style={{ textAlign: "center", position: "absolute", top: "25%", left: "50%" }}>
        <h3>Logging Out</h3>
        <Spinner />
      </div>
    )
  }
}

export default Logout
We get to utilize componentWillMount again to trigger the sign-out process, and we’re even using the Spinner code again. This repetition shows that we might want to extract out a LoadingIndicator component that takes in a message prop, but I’ll leave that to you. Now logging out (by visiting “/logout”) and logging in should both work, but we should probably add an icon to the Header if signed in.
src/components/Header.js
import React, { Component } from 'react';
import { Link } from 'react-router-dom';

class Header extends Component {
  render() {
    return (
      <nav className="pt-navbar">
        <div className="pt-navbar-group pt-align-left">
          <div className="pt-navbar-heading">Chord Creator</div>
          {this.props.authenticated
              ? <input className="pt-input" placeholder="Search Songs..." type="text" />
              : null
          }
        </div>
        {this.props.authenticated
            ? (
              <div className="pt-navbar-group pt-align-right">
                <Link className="pt-button pt-minimal pt-icon-music" to="/songs">Songs</Link>
                <span className="pt-navbar-divider"></span>
                <button className="pt-button pt-minimal pt-icon-user"></button>
                <button className="pt-button pt-minimal pt-icon-cog"></button>
                <Link className="pt-button pt-minimal pt-icon-log-out" aria-label="Log Out" to="/logout"></Link>
              </div>
            )
            : (
              <div className="pt-navbar-group pt-align-right">
                <Link className="pt-button pt-intent-primary" to="/login">Register/Log In</Link>
              </div>
            )
        }
      </nav>
    );
  }
}

export default Header;
Setting Up Email/Password Authentication
Now that the application can handle Facebook sign in and we’re able to log out we need to implement email/password authentication. This function is more complicated than the Facebook authentication method because:
- A user with the given email may exist, having signed in using Facebook.
- The user might not yet exist, so we need to register them.
- The user might exist and we get an error when signing in.
To handle these cases we’re going to be making first a call to get the providers attached to the email address. Using the provider list, we’ll be able to determine where to go next or what message to show the user. Here’s what the final method looks like:
src/components/Login.js
  // only authWithEmailPassword was changed
  authWithEmailPassword(event) {
    event.preventDefault()

    const email = this.emailInput.value
    const password = this.passwordInput.value

    app.auth().fetchProvidersForEmail(email)
      .then((providers) => {
        console.log("we're hitting the first then")
        if (providers.length === 0) {
          // create user
          return app.auth().createUserWithEmailAndPassword(email, password)
        } else if (providers.indexOf("password") === -1) {
          this.toaster.show({ intent: Intent.WARNING, message: "Try alternative login." })
        } else {
          // sign in with email/password
          return app.auth().signInWithEmailAndPassword(email, password)
        }
      })
      .then((user) => {
        if (user && user.email) {
          this.loginForm.reset()
          this.setState({ redirect: true })
        }
      })
      .catch((error) => {
        this.toaster.show({ intent: Intent.DANGER, message: error.message })
      })
  }
If the user needs to be created or can sign in with a password, then we return the Promise from signInWithEmailAndPassword or createUserWithEmailAndPassword from our first handler so that the second then call can resolve the results and any errors will still be displayed.
Recap
We covered a lot in this tutorial. You now know how to create a Facebook app, use Firebase authentication, redirect using react-router, and render a “toast” and a “spinner” with Blueprintjs. In the next tutorial, we’ll continue working with our logged in user by changing some of our routes to require authentication and by associating songs with the users themselves.