Our React application likely isn’t finished, but it’s good enough that we might want to share it with others to get feedback. In this tutorial, we’ll be covering how we can build and deploy our application to a server.
Goals
- Build our React application for deployment.
- Get our application deployed to Netlify (for free).
Today is the day that we’ve been building up to for a long time. It is time to share our application with the outside world (or at least a few people). We’re going to be deploying to Netlify in today’s tutorial, but you could take what we cover here and deploy to many different places because the general idea will be the same.
Building our Application For Production
While we probably shouldn’t call our application “done” we’re still going to build it to be deployed in a production setting. We want to make sure that the code is as light-weight as possible so that our users can download the JavaScript quickly, without using too much data. Thankfully for us, create-react-app set up a command to leverage Webpack to build our production bundle easily. Let’s use this command now and see what we get:
$ yarn run buildYou should get output similar to this:
yarn run v0.27.5
$ react-scripts build
Creating an optimized production build...
Compiled successfully.

File sizes after gzip:

  226.27 KB  build/static/js/main.a8d5e376.js
  24.51 KB   build/static/css/main.109e1fc0.css

The project was built assuming it is hosted at the server root.
To override this, specify the homepage in your package.json.
For example, add this to build it for GitHub Pages:

  "homepage" : "http://myname.github.io/myapp",

The build folder is ready to be deployed.
You may serve it with a static server:

  yarn global add serve
  serve -s build

Done in 22.54s.
That explains how you might go about deploying the application to Github pages, so feel free to give that a shot. We need to make sure that it works as expected when served up, so we’re going to run that last portion to create a static web server locally.
$ yarn global add serve
$ serve -s build
Visiting localhost:5000 you should see that everything still works and you can even log in as expected.
If we take a look at the directory structure of the build directory, we can see that it’s nothing but static assets with the index.html being at the root of the folder.
build
├── asset-manifest.json
├── favicon.ico
├── index.html
├── manifest.json
├── service-worker.js
└── static
    ├── css
    │   ├── main.109e1fc0.css
    │   └── main.109e1fc0.css.map
    ├── js
    │   ├── main.a8d5e376.js
    │   └── main.a8d5e376.js.map
    └── media
        ├── icons-16.311f9ffb.eot
        ├── icons-16.4f5c35f7.woff
        ├── icons-16.cc21326e.ttf
        ├── icons-20.485d934d.eot
        ├── icons-20.c277c90f.woff
        └── icons-20.eeeeeaf1.ttf
This directory structure means that you can put this bundle on any webserver and get it served up with minimal configuration.
An interesting point about this deployment is that it contains the configuration that we have for Firebase set in src/base.js, and ideally, we would have different credentials for production vs. development. Thankfully, with the wait that we set up src/base.js this won’t require any code changes:
src/base.js
// imports omitted

const config = {
  apiKey: process.env.REACT_APP_FIREBASE_KEY,
  authDomain: process.env.REACT_APP_FIREBASE_DOMAIN,
  databaseURL: process.env.REACT_APP_FIREBASE_DATABASE,
  projectId: process.env.REACT_APP_FIREBASE_PROJECT_ID,
  storageBucket: process.env.REACT_APP_FIREBASE_STORAGE_BUCKET,
  messagingSenderId: process.env.REACT_APP_FIREBASE_SENDER_ID
};

// exports omitted
The use of process.env.REACT_APP_ meant that we could load in environment variables at build time. I encourage you to create new Firebase and Facebook applications for to utilize in your applications when not in development, but we’re not going to cover how to do that again.
Getting Started with Netlify
We’re going to use Netlify for this tutorial for a few reasons:
- It’s free for our purposes right now.
- We can deploy based on our git workflow.
- We can get easily set up TLS/SSL for free on a custom domain.
Before you continue, you’ll want to make sure that you’ve created your Netlify account. Once created your account it’s time to deploy the application. There are two ways to do this on Netlify:
- Drag and drop the
builddirectory onto the sites page to cause a manual deploy. This type of deployment is great for prototypes and throw away sites. - Create a git based deployment from GitHub, gitlab, or bitbucket.
The second method is actually how this website (coderjourney.com) is deployed. We’ll go through both set ups right now.
Deploying the Application Manually
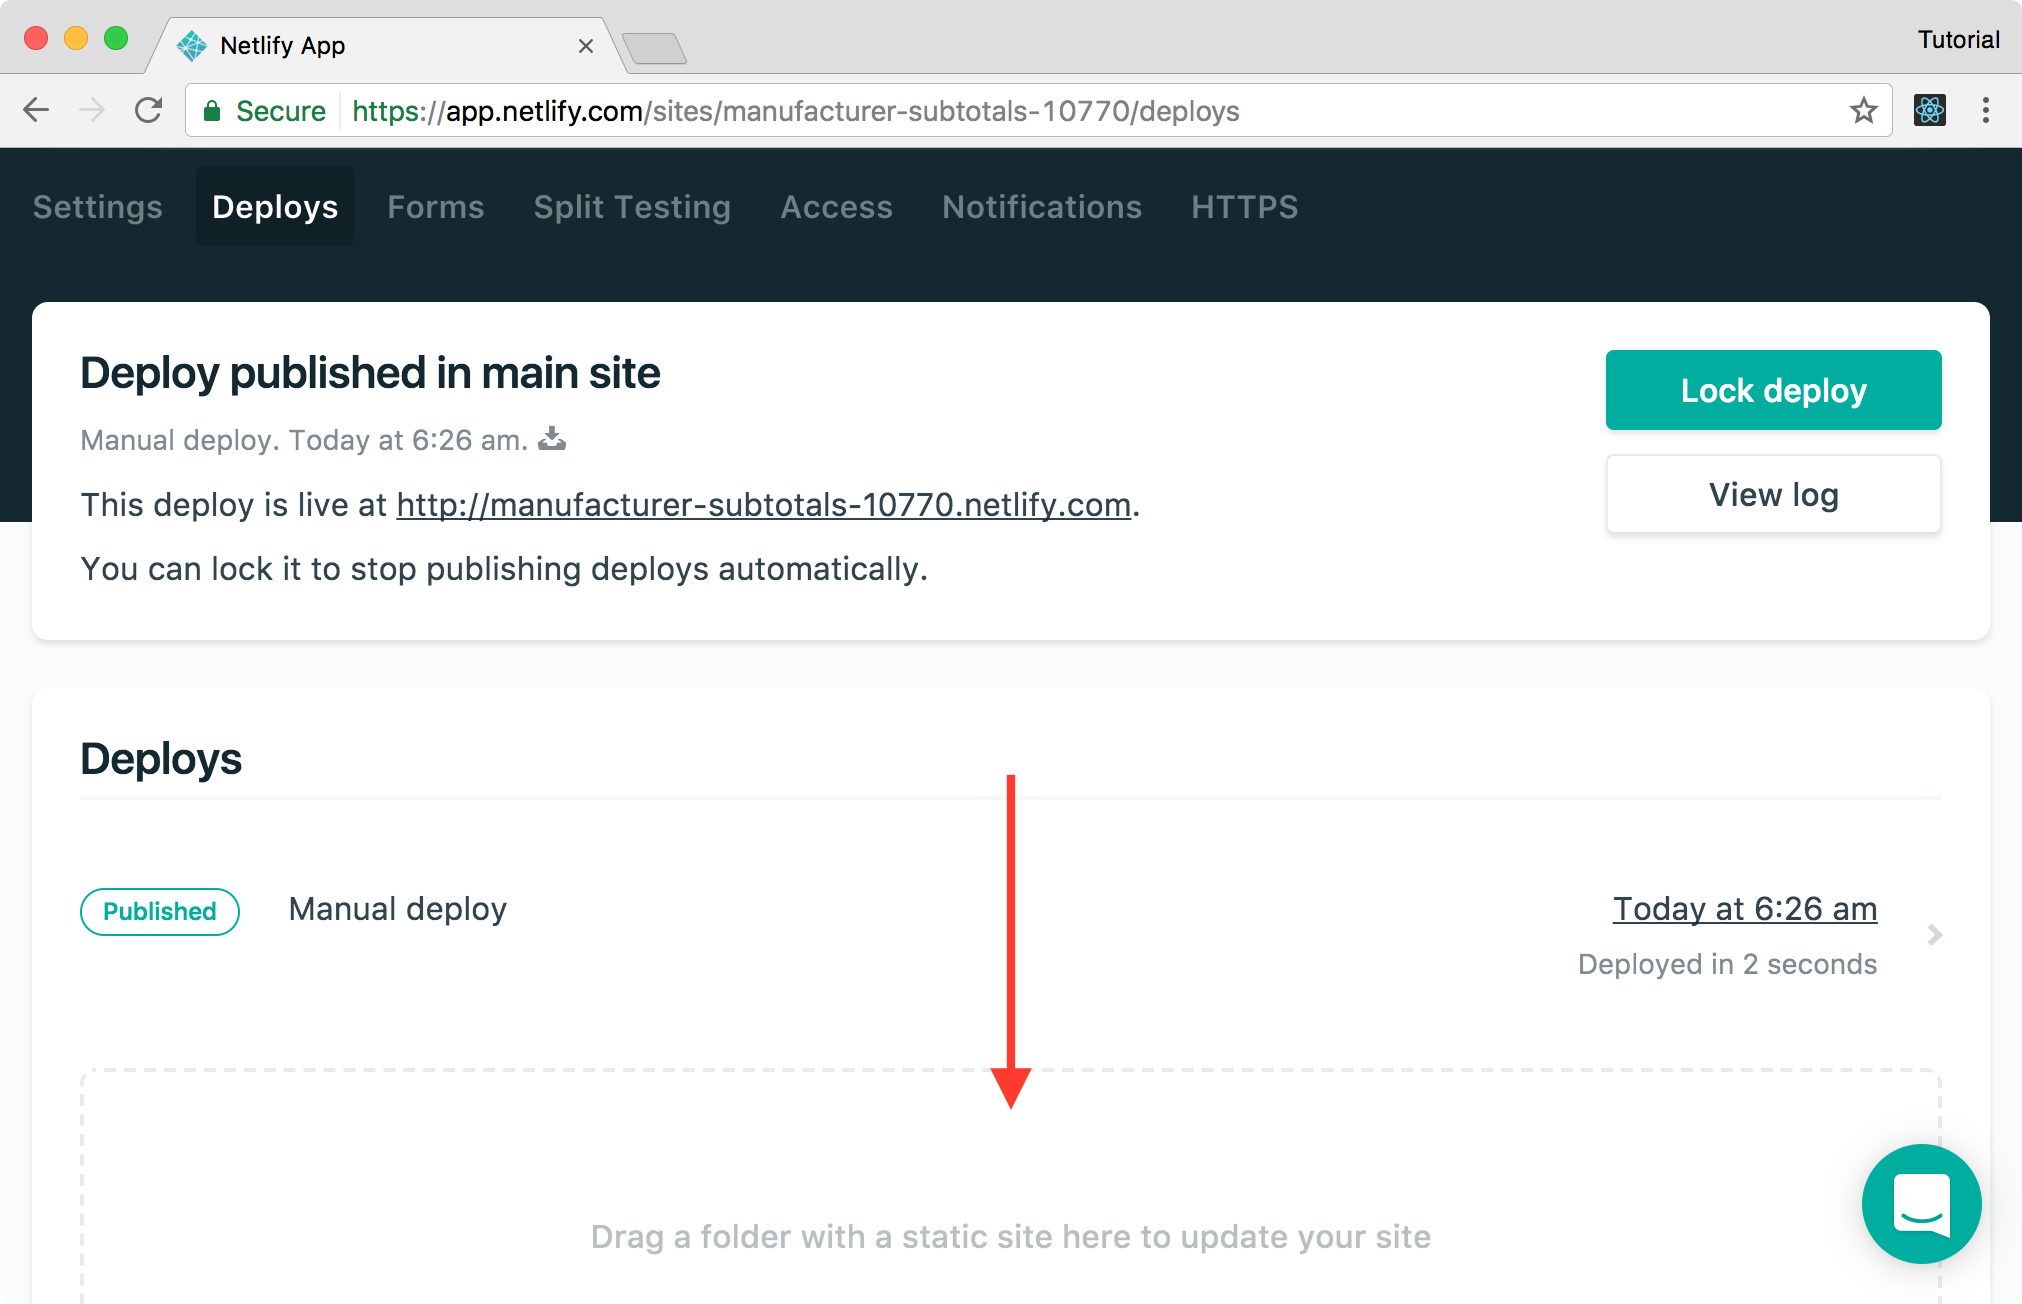
The first approach we’re going to take is the manual approach, which can be done by dragging the folder into the drop zone on sites page. It should look like this:

Once the deployment is complete, you will see the link that you can click to see the website live on the internet! Going back to Netlify, you can click on the application name in the bread crumbs to get to the site’s settings. If you navigate to the “Deploy” tab for the application, you’ll see the drop zone area again. You can deploy updates to this site by dragging a new build into this drop zone.
Continuous Deployment with Git
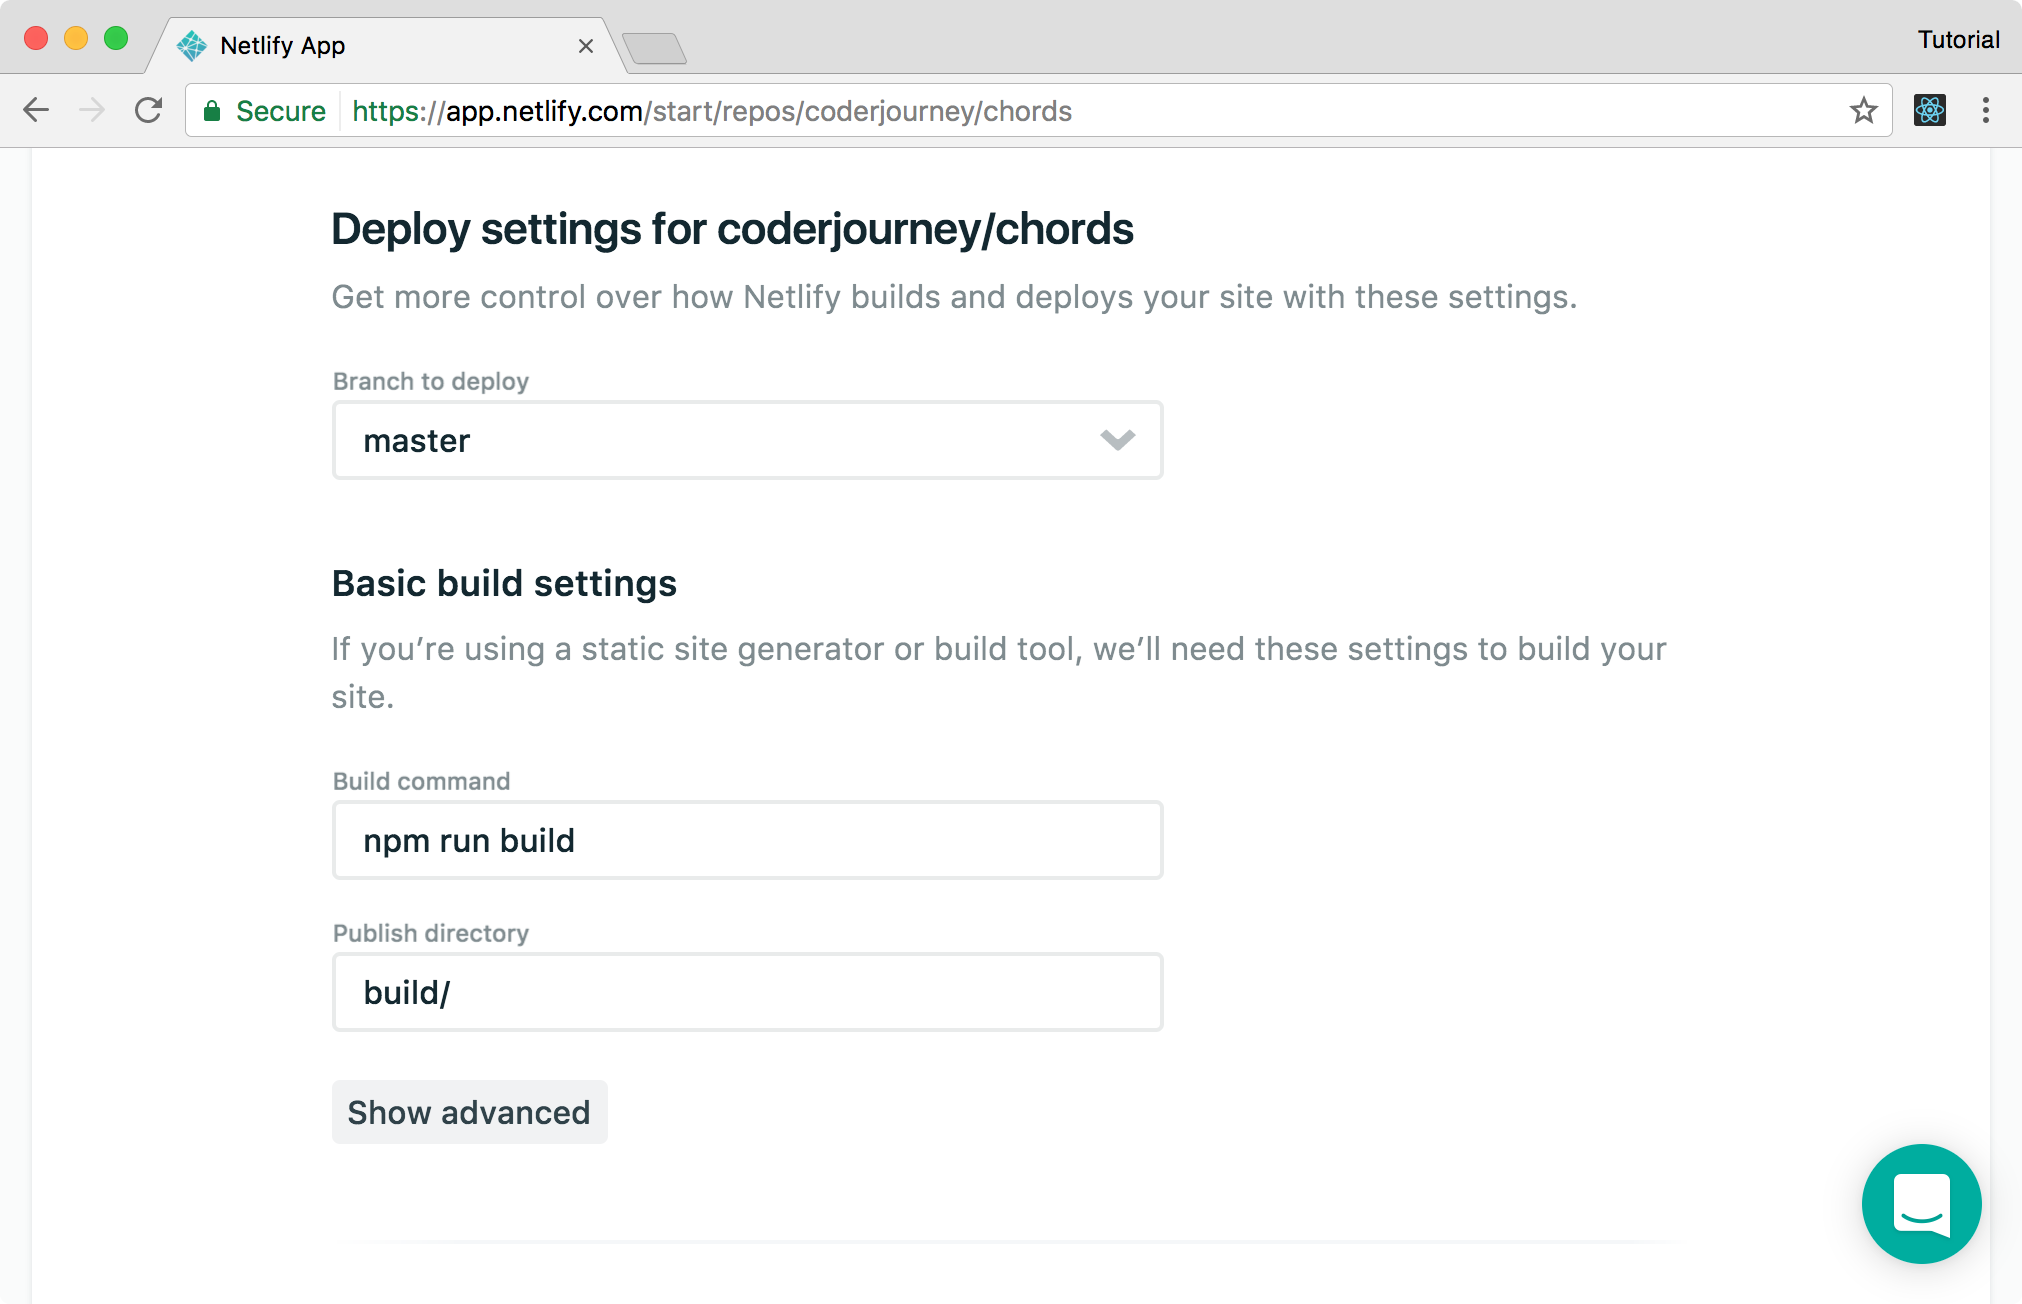
Manual deploying is fine, but it’s also nice to be able to have the source code deployed when you say that it’s ready. Netlify is based around the idea of a git based workflow, and if your React application is in git, you can use this method. This tutorial’s source code can be found on Github and we’re going to deploy from there. We’ll create this deployment from scratch by clicking on the left most bread crumb and then selecting “New site from Git.” After selecting a repository, you’ll be able to see the build settings that conveniently default to running npm run build and then publishing the /build directory. We won’t manually need to do the building manually anymore.
Unfortunately, once the build has finished and you click the link, you won’t see anything. If you inspect the page, you’ll see that it failed to find the Firebase database, and this goes back to the environment variables that we mentioned before. Thankfully, there is a way for us to fix this within Netlify by setting environment variables. Click the “Settings” tab and scroll down to the environment variables area. From here, you’ll want to fill in all of the variable names that are in your .env file locally and if you’ve configured a production application, you’ll want to use those values. Once you’ve filled in these values, you will want to go to the “Deploys” tab and click “Trigger Deploy.”
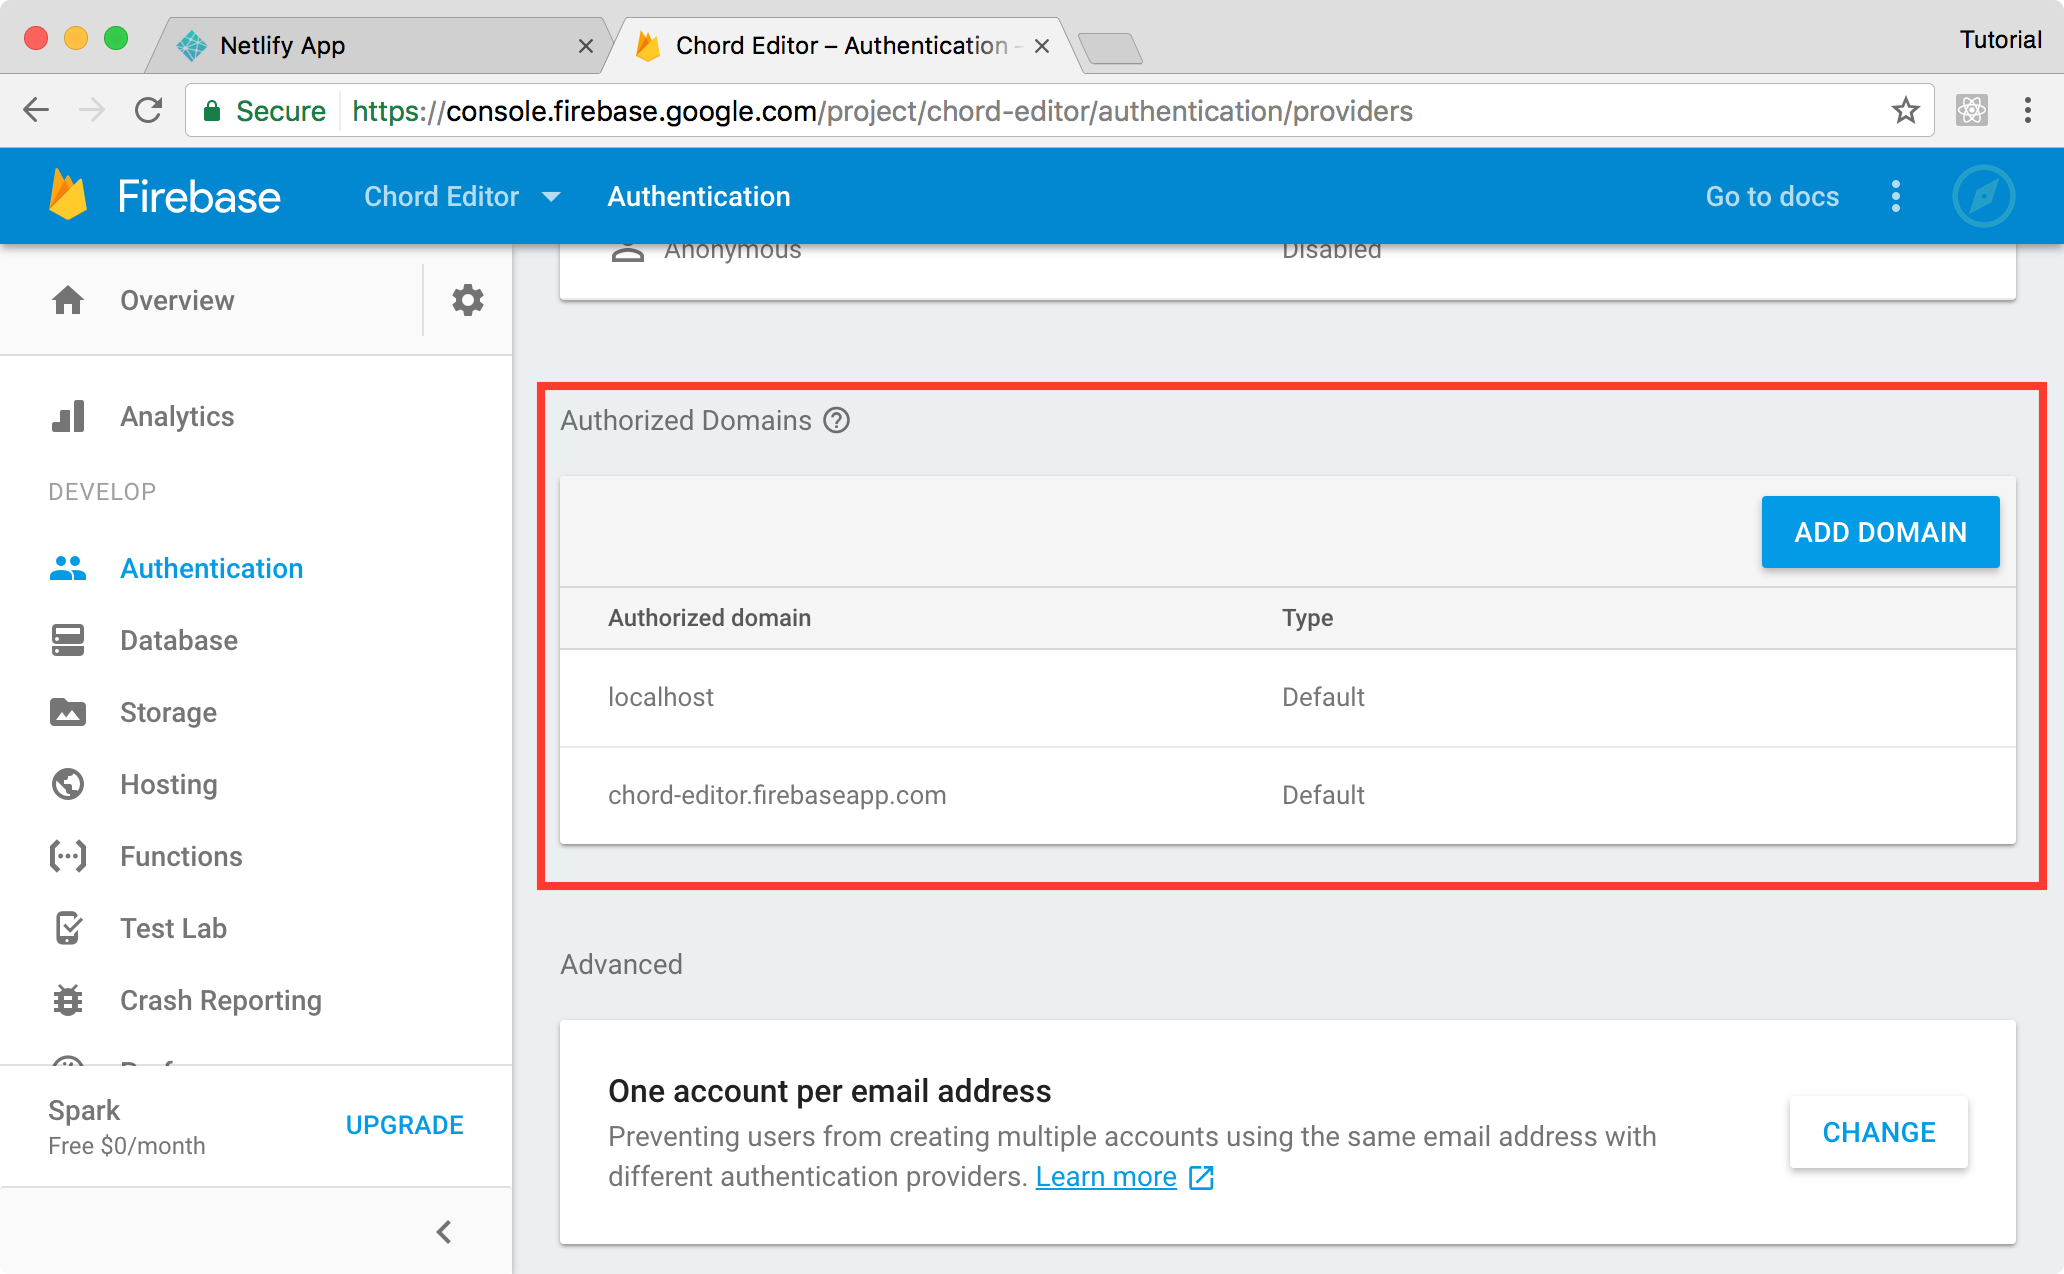
After a short delay, you should see that your application has been deployed successfully and is useable again. If you attempt to log in with Facebook, you will see that it doesn’t work. Looking at the console, we can see that the error is because the new domain that we’re on isn’t permitted with our authentications. We’ll need to add this as an “authorized domain” within the firebase console.
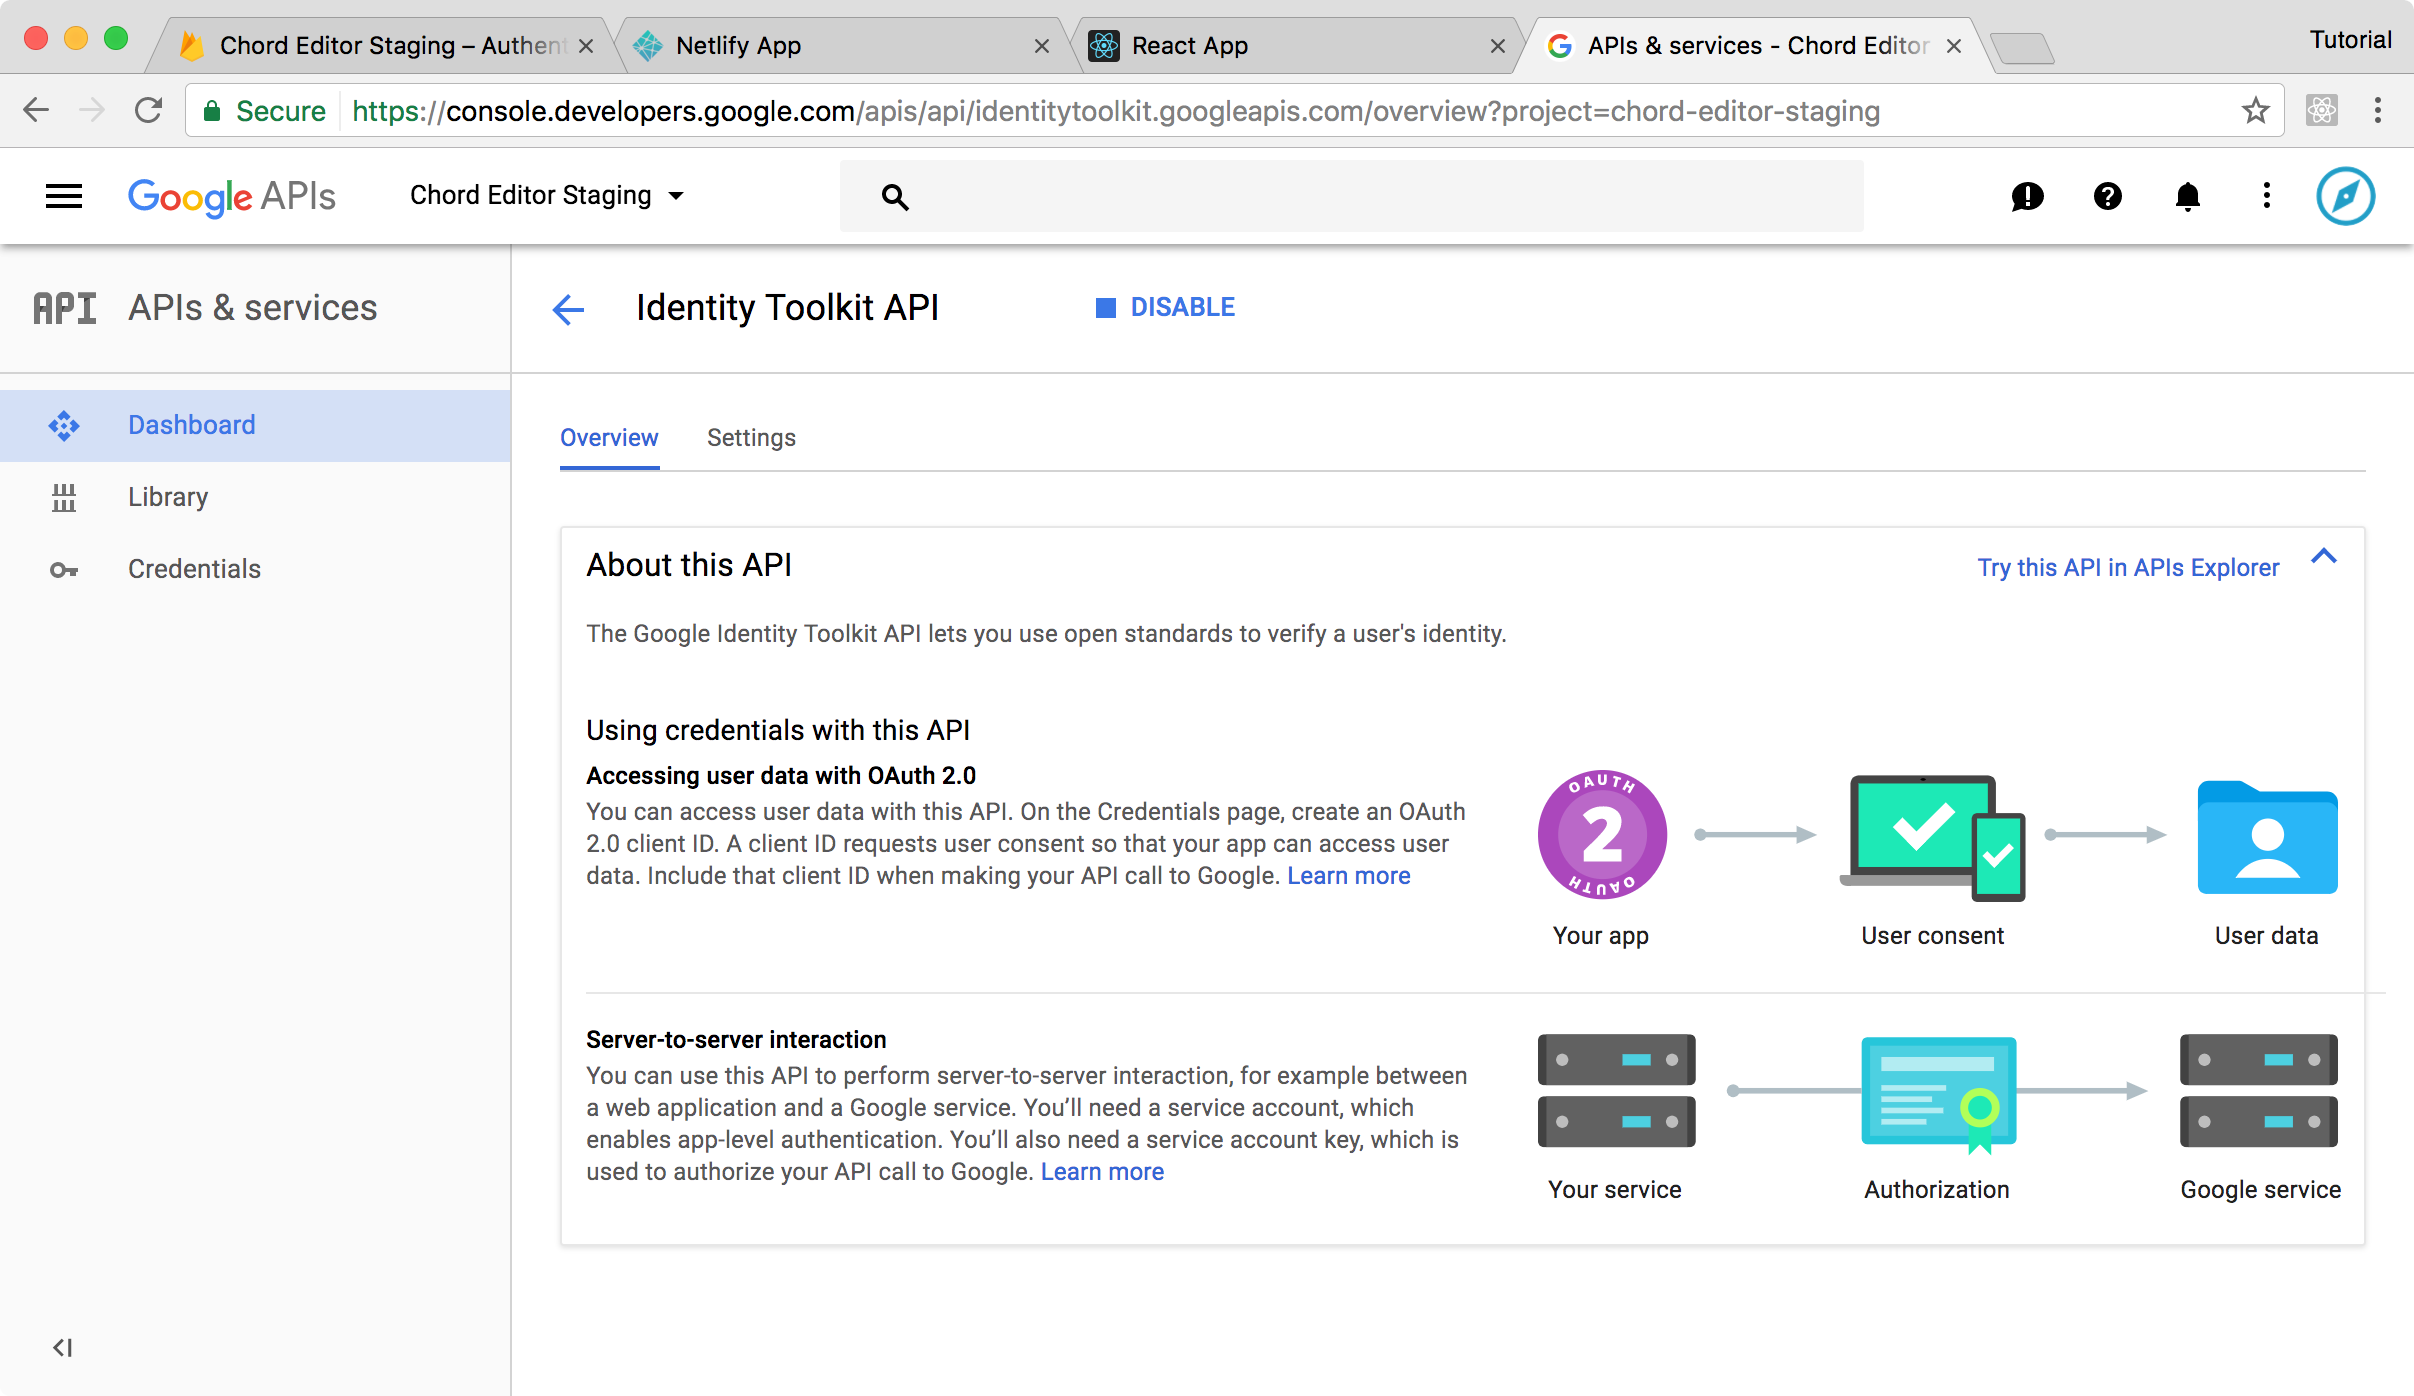
We also need to enable the “Identity Toolkit API” in the Google console by going here.
With those two settings adjusted we should be able to login with Facebook now. You might notice that if you navigate directly to the /songs or /login routes that you get a 404 error, and that’s the last thing that we need to fix.
Redirecting All Traffic with Netlify
React Router is in charge of handling routes, so we need to make sure that no matter the URL that we load our React application. Thankfully, Netlify provides us a way to do this via a _redirects file. We need to make sure that this file sits at the root of our build directory. The build directory is replaced when yarn run build is run, so we need to put our _redirects file in the public directory to have it put into the root of the final build directory.
public/_redirects
/* /index.html 200The above line states that we want all paths redirected to /index.html with a response of 200. Start tracking this file with git, commit, and push to release these changes. Once the build is run you can now go to any route we would normally go to, and the application will work as expected.
Recap
Since React applications are static websites, the deployment process isn’t as complicated as we might think given how many tools we use in development. We learned how to deploy the application manually and also how to set up a git based deployment flow using Netlify, but hopefully, you can see how this would be achievable deploying somewhere else.